Laravel has recently been shipped with a new helper called defer() which can be used to defer the execution of a callback until after a successful response has been sent.
This way you can offload time-consuming work (such as calling an external API) to a callback and return a response to the user as soon as possible.
Here’s what it looks like.
Route::get('/defer', function () {
    defer(function () {
        // do time-consuming work here
        sleep(10);
    });

    return "Hello world";
});
As you can tell, the defer() helper takes a callback as its parameter and will be executed after the response has been sent. So, when you call this route, you’ll see the response instantaneously even if the callback takes 10 seconds to execute.
The deferred callback won’t be executed if the request results in a 4xx or 5xx HTTP response. This behavior can be changed by passing true as the third parameter to the defer() helper or calling the always() method on the returned object. The callback will be executed regardless of the response status code.
Route::get('/defer', function () {
    defer(function () {
        // do time-consuming work here
        sleep(10);
    })->always();

    return "Hello world";
});
Now, all this is great but I wanted to know how this works under the hood since Taylor has mentioned that it’s not using any queues or anything like that. And that intrigued me.
So, I decided to dig into the code and see what was going on. And after a lot of going back and forth in the source code, I finally found the answer.
If you also want to know the magic behind this little gem (like me), keep on reading.
The shape of the defer() helper
First things first, let’s take a look at the defer() helper.
use Illuminate\Foundation\Defer\DeferredCallback;
use Illuminate\Foundation\Defer\DeferredCallbackCollection;

/**
 * Defer execution of the given callback.
 *
 * @param  callable|null  $callback
 * @param  string|null  $name
 * @param  bool  $always
 * @return \Illuminate\Foundation\Defer\DeferredCallback
 */
function defer(?callable $callback = null, ?string $name = null, bool $always = false)
{
    if ($callback === null) {
        return app(DeferredCallbackCollection::class);
    }

    return tap(
        new DeferredCallback($callback, $name, $always),
        fn ($deferred) => app(DeferredCallbackCollection::class)[] = $deferred
    );
}
As you can tell, nothing too fancy here. What the helper is essentially doing is creating an instance of the DeferredCallback class and then adding it to the DeferredCallbackCollection class that’s been resolved from the container.
The interesting thing to notice here is that the object of the DeferredCallback class will be assigned to an array of the DeferredCallbackCollection class instance. This means it will accumulate all the callbacks that are being deferred in the current request.
So, at the end of the request, this array will have all the callbacks that need to be executed.
The DeferredCallback class
The DeferredCallback class is responsible for defining the callbacks with a unique name and a few methods such as always(), name(), and __invoke().
So, if we dump the defer callback…
$d = defer(function () {
    sleep(10);
});

dd($d);
This will output something like this.
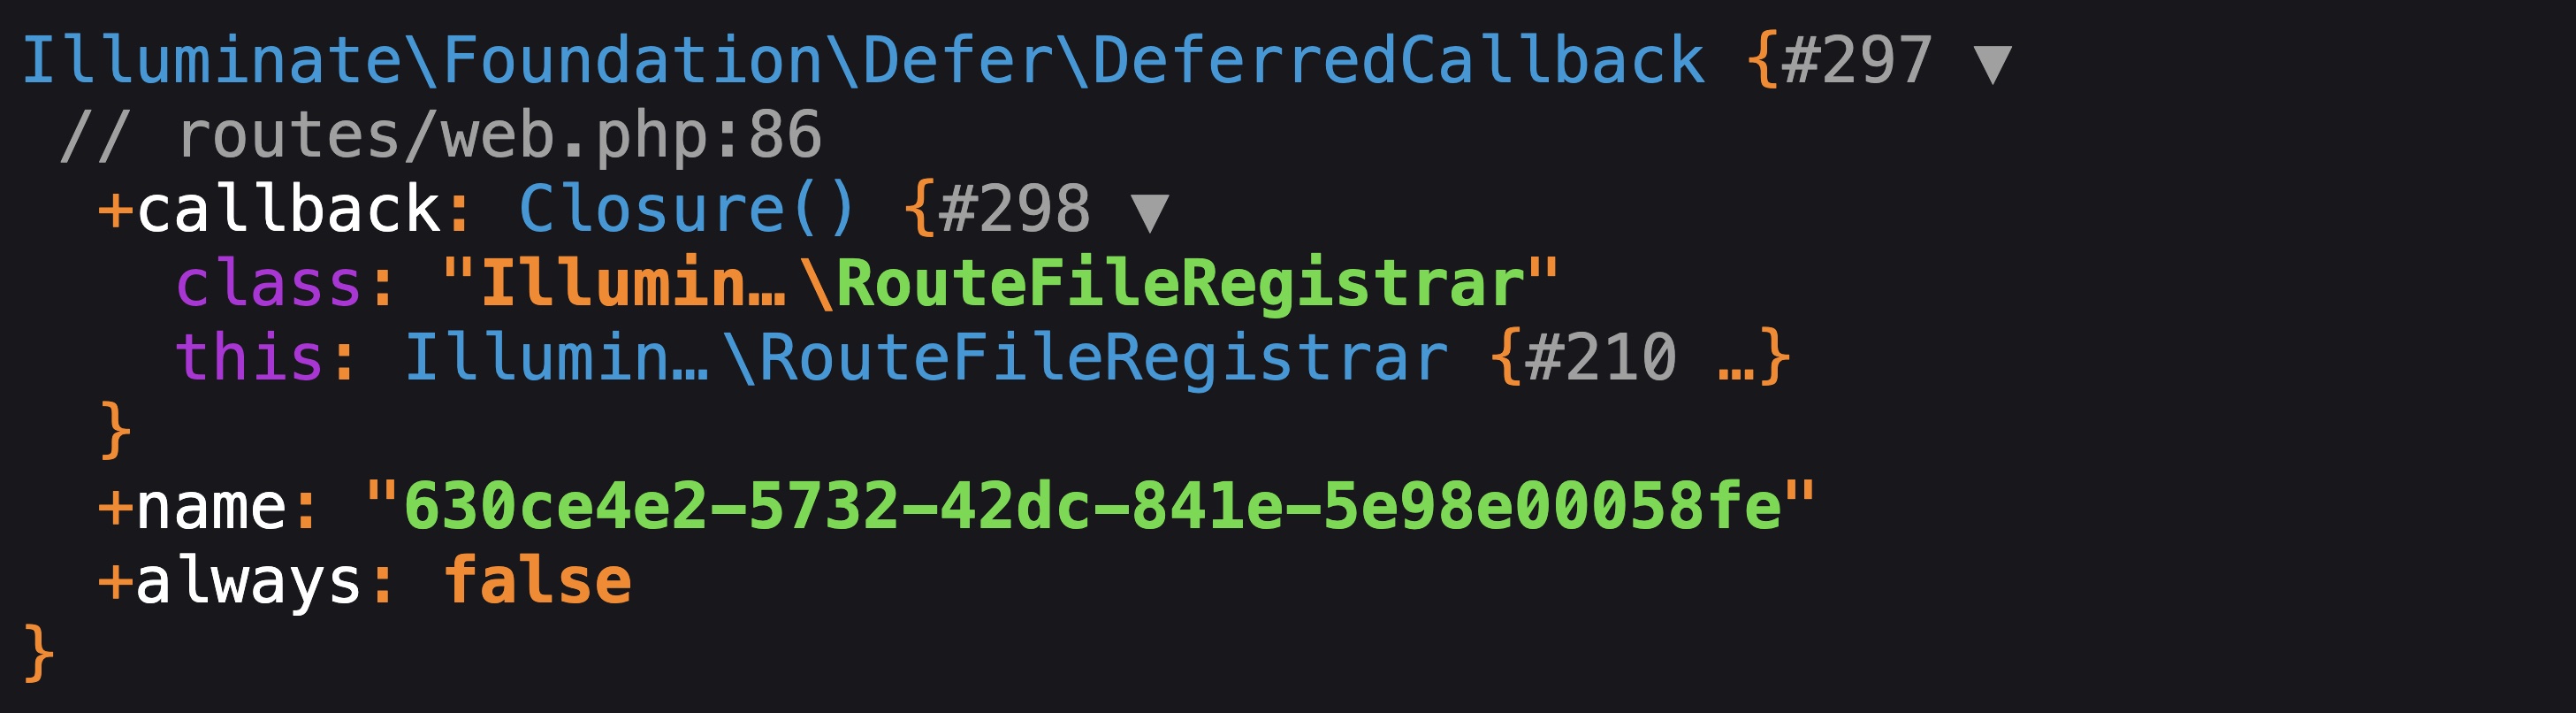
As you can see, the object has a name (to uniquely identify a callback), a callback (passed calledback), and an always property.
And that’s about the DeferredCallback class.
The real magic
We saw the definition of the defer() helper and the DeferredCallback class but it still doesn’t explain how the callbacks are executed at a later time.
The real magic happens in the new global middleware that’s been added in the core.
\Illuminate\Foundation\Http\Middleware\InvokeDeferredCallbacks::class
If you look at the source code of this middleware, it looks pretty simple at first glance. But check out the terminate() method.
Yep! That’s the real deal, my friend! Laravel piggybacks to this method to achieve the final result.
So, if you don’t know,
The terminate() method in the middleware is used to perform actions after the response has been sent to the user.
Here’s what the terminate() method of the InvokeDeferredCallbacks middleware looks like.
/**
 * Invoke the deferred callbacks.
 *
 * @param  \Illuminate\Http\Request  $request
 * @param  \Symfony\Component\HttpFoundation\Response  $response
 * @return void
 */
public function terminate(Request $request, Response $response)
{
    Container::getInstance()
        ->make(DeferredCallbackCollection::class)
        ->invokeWhen(fn ($callback) => $response->getStatusCode() < 400 || $callback->always);
}
As you can tell, the terminate() method is invoking the DeferredCallbackCollection class which has all the deferred callbacks, as we saw earlier, that have been accumulated in the current request.
The invokeWhen() lets the container know that the callbacks should be invoked and executed only if the response status code is less than 400 or the callback has the always property set to true.
And that’s pretty much it. This is how Laravel achieves the magic behind the defer() helper.
As someone truly said, “The magic is in the simple things.”
A word on the terminate() method
After I published this article, many people wondered how Laravel magically knew how to terminate the request after the defer() callback had been executed. So, here’s a quick explanation.
So, essentially, Laravel relies upon a protocol called FastCGI (that first needs to be enabled on the server). FastCGI maintains a pool of PHP processes that persists beyond executing a single request.
This means that the PHP process does not terminate immediately after sending the response, allowing Laravel to execute additional code (like the terminate() method) after the response is dispatched.
Laravel uses the request lifecycle to ensure all terminate methods are called in the reverse order of their middleware registration. This happens at Laravel’s Kernel level.
]]>