How I implemented a Konami easter egg on my blog
So, the other day, I was going through my Twitter feed and I saw this tweet. This user had explored an easter egg on the newly designed Stripe.com’s website.
The easter egg is nothing but a sequence of different keypress known as Konami Code (↑↑↓↓←→←→BA), which when achieved, can invoke this control panel at the bottom of the page.
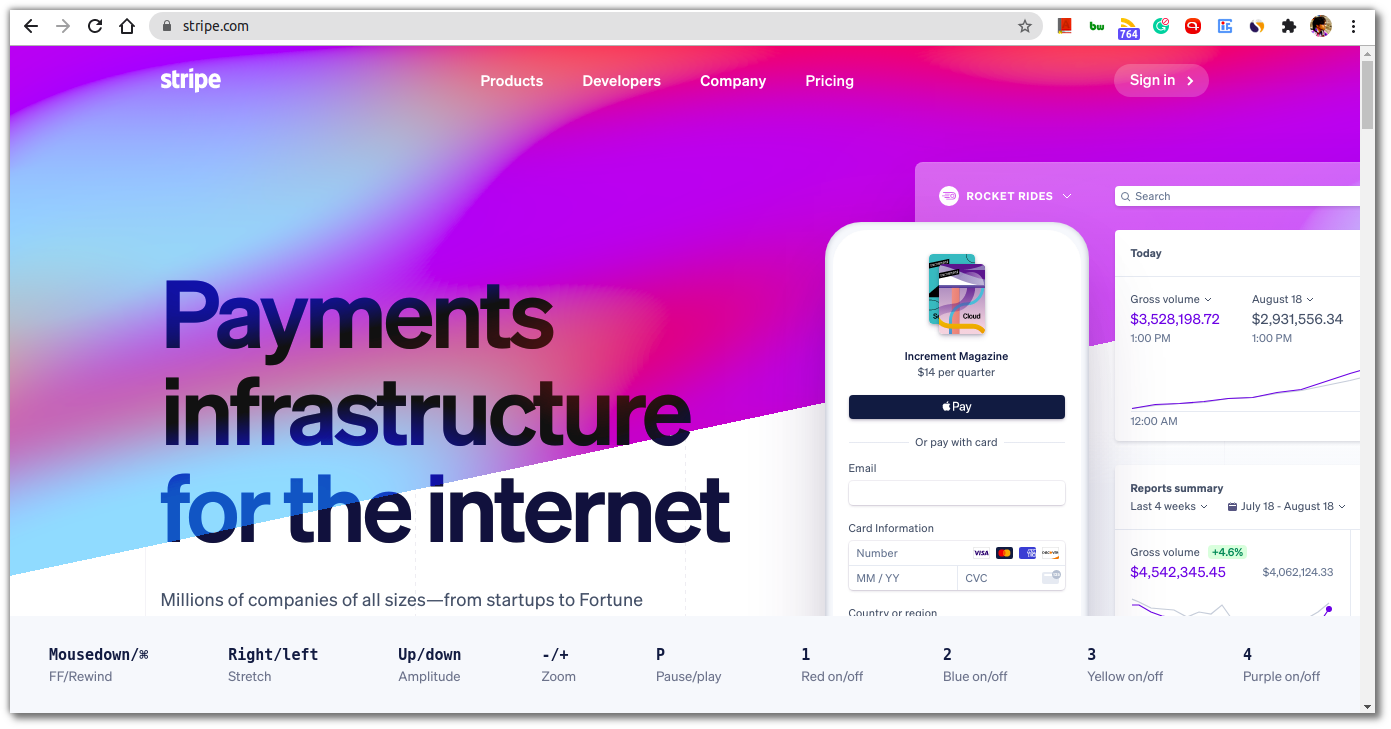
Using this panel, you can play around with the gradients which are there at the top of the header. Things such as turn off different gradient colors, pause/play the animation, and so on.
The Konami Code (Japanese: コナミコマンド, Konami komando, “Konami command”) is a cheat code that appears in many Konami video games, and some non-Konami games. In the original code, the player can press the sequence of buttons (mentioned previously) on the game controller to enable a cheat or other effects.
I found this so cool and I was tempted to implement something like this on my blog as well.
And it turns out, it’s rather really simple to do so. Here’s the entire code in vanilla JavaScript which can invoke a cool Confetti upon pressing Konami code sequence.
const keySequence = [];
let konamiString = '';
const konamiCode = [
    'ArrowUp',
    'ArrowUp',
    'ArrowDown',
    'ArrowDown',
    'ArrowLeft',
    'ArrowRight',
    'ArrowLeft',
    'ArrowRight',
    'b',
    'a'
];

document.addEventListener('keyup', function(e) {
    keySequence.push(e.key);
    keySequence.splice(
        -konamiCode.length - 1,
        keySequence.length - konamiCode.length
    );
    konamiString = konamiCode.join('');

    if (keySequence.join('').includes(konamiString)) {
        const confettiConfig = { target: 'confetti-holder' };
        const confetti = new ConfettiGenerator(confettiConfig);
        confetti.render();
    }
});
Let’s break down the code and understand what’s going on.
The variable keySequence is used to store the key sequence that the user on the site will press. The konamiCode is the variable that holds the actual Konami code as an array, which I’m using to match the key sequence later in the code. The konamiString is used to store the string form of the konamiCode array later in the code.
Next, I’ve registered an event listener which will listen to the keyup event. Inside the event listener, I’m storing the key sequence by pushing it into the keySequence variable through the following line of code.
keySequence.push(e.key);
The next line is important. The Konami code consists of only 10 keys. So, we don’t want to store more than 10 keys into the keySequence as that would be overkill. For this, we’re splicing off the array from the reverse to the length of the Konami code with the following code like so.
keySequence.splice(
    -konamiCode.length - 1,
    keySequence.length - konamiCode.length
);
The rest of the code is simple. All we need to do is convert both keySequence and konamiCode to string and compare both to invoke the easter egg like so.
konamiString = konamiCode.join('');

if (keySequence.join('').includes(konamiString)) {
    // invoke the eater egg of your choice
}
In the if condition, you can invoke whatever you’d like. I’ve invoked a cool confetti effect on the page using this library. But you can choose to do invoke a host of other things. Like the one on Stripe.com. The possibilities are endless!
But before that, try it out on here right now and feel the superpower! 😉
I hope you learned something new here and let me know in the comments what you’d like to do with Konami code your site/blog/web app.
Until next time!

👋 Hi there! This is Amit, again. I write articles about all things web development. If you enjoy my work (the articles, the open-source projects, my general demeanour... anything really), consider leaving a tip & supporting the site. Your support is incredibly appreciated!