Local websites with Custom domains and HTTPS using Caddy Server
There are times when you would want your local websites to be accessible through a custom domain name and also over HTTPS. This is especially useful when you’re working on a project that requires a custom domain name and HTTPS to work properly.
For instance, you might need this to test your progressive web apps (PWAs) which require a custom domain name and HTTPS to work properly. But even if you’re not working on PWAs, it’s nice to have these additional perks set up for your local websites.
To make your existing local websites have these requirements, you can use a web server called Caddy. It’s a lightweight web server that’s easy to set up and configure.
The main selling point of Caddy is that it automatically enables HTTPS for all your websites by default.
We’ll see how you can set up Caddy on your system and configure it to serve your local websites through a custom domain name and HTTPS.
Installing Caddy
Caddy is available for all major platforms including Windows, macOS, and Linux. You can check the installation instructions for your platform.
In my case, I installed it using Homebrew on Ubuntu like so.
brew install caddy
To check if Caddy is installed correctly, you can run the following command.
caddy version
This should print the version of Caddy installed on your system.
Configuring Caddy
Now, I wanted to serve one of my local websites through a custom domain name and HTTPS.
So, I created a file called Caddyfile (without any extension) in the root of my project directory and added the following configuration to it.
notepad.localhost {
	reverse_proxy localhost:3333
}
As you can tell, I’m serving my local website running on localhost:3333 through a custom domain name called notepad.localhost.
Caddy works as a reverse proxy here. It proxies the requests coming from notepad.localhost to localhost:3333 where my local website is running.
Once that’s done, you can start the Caddy server by running the following command in the directory where the Caddyfile is located.
caddy run
This will start the Caddy server and you should be able to access your local website through the custom domain name you’ve configured. But this won’t work over HTTPS yet.
Note: Depending on the system, Caddy may need permission to bind to low ports. One way to do this on Linux is to use setcap:
sudo setcap cap_net_bind_service=+ep $(which caddy)
Since Caddy uses HTTPS automatically and by default, serves IP addresses and local/internal hostnames over HTTPS using self-signed certificates that are automatically trusted locally (if permitted).
But the self-signed certificates by Caddy didn’t work correctly for me. So, I had to create my own self-signed certificates and use them instead.
And I did that using a tool called mkcert.
Installing mkcert
To create my own self-signed certificates, I used a tool called mkcert which is a simple tool for making locally-trusted development certificates.
You can install it using Homebrew like so.
brew install mkcert
Once installed, you can run the following command to create a self-signed certificate for your custom domain name.
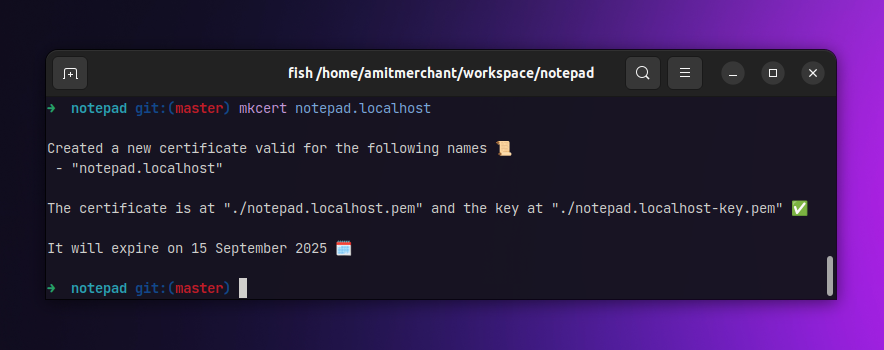
In my case, I wanted to create a certificate for notepad.localhost so I ran the following command.
mkcert notepad.localhost
This will create two files in the current directory.
notepad.localhost.pem- The certificate file.notepad.localhost-key.pem- The private key file.
We can use these files to serve our local website over HTTPS using Caddy.
Configuring Caddy for HTTPS
Once you have the certificate and private key files, you can configure Caddy to serve your local website over HTTPS by adding the following configuration in your Caddyfile.
notepad.localhost {
	tls ./notepad.localhost.pem ./notepad.localhost-key.pem
	reverse_proxy localhost:3333
}
As you can tell, we’re using the tls directive to tell Caddy to use the certificate and private key files we’ve generated using mkcert.
Once that’s done, you can restart (terminate the existing instance) the Caddy server again by running the following command.
caddy run
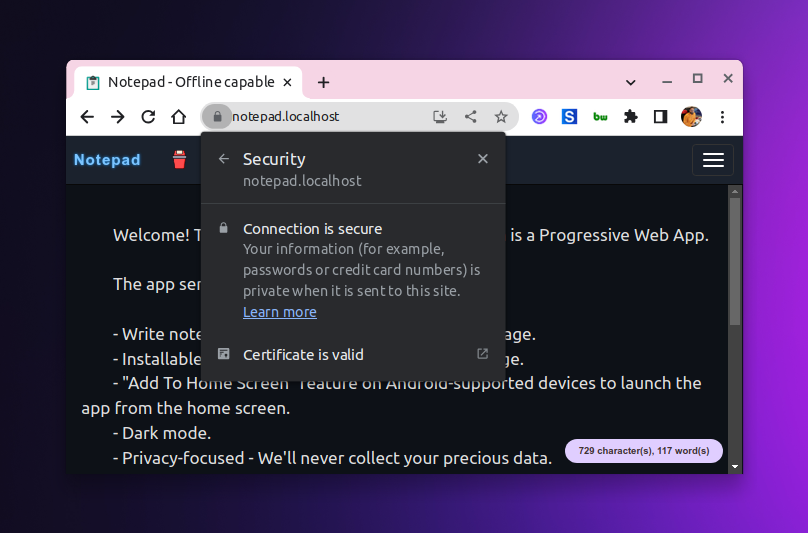
And that’s it. You should now be able to access your local website through the custom domain name you’ve configured and also over HTTPS with a valid certificate.
★ Premium Resource Recommendation
LocalCan — Develop apps with Public URLs and .local domains (with HTTPS)

👋 Hi there! This is Amit, again. I write articles about all things web development. If you enjoy my work (the articles, the open-source projects, my general demeanour... anything really), consider leaving a tip & supporting the site. Your support is incredibly appreciated!